- Introduction & Objectives
- Architecture Overview
- Step 1 — Create the
product-service - Step 2 — Create the
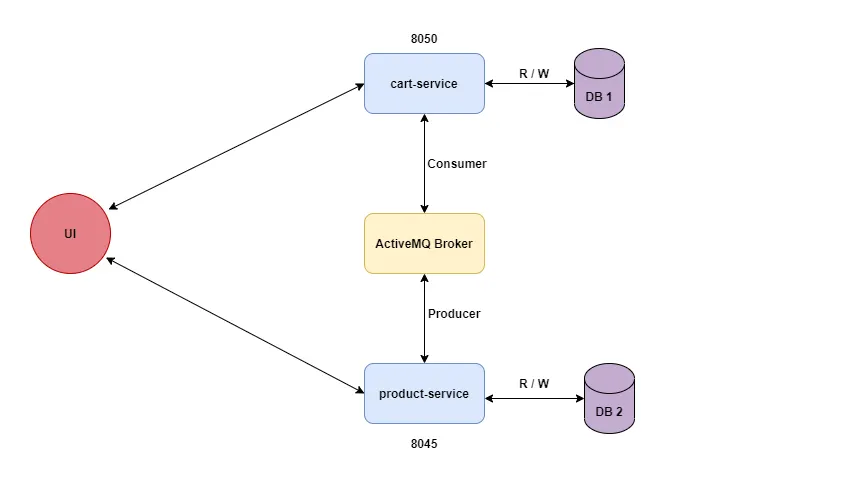
cart-service - Step 3 — Inter-Service Communication with ActiveMQ
- Step 4 — API Gateway with Spring Cloud Gateway
- Step 5 — Service Discovery with Eureka
- Step 6 — Final Testing & Wrap Up
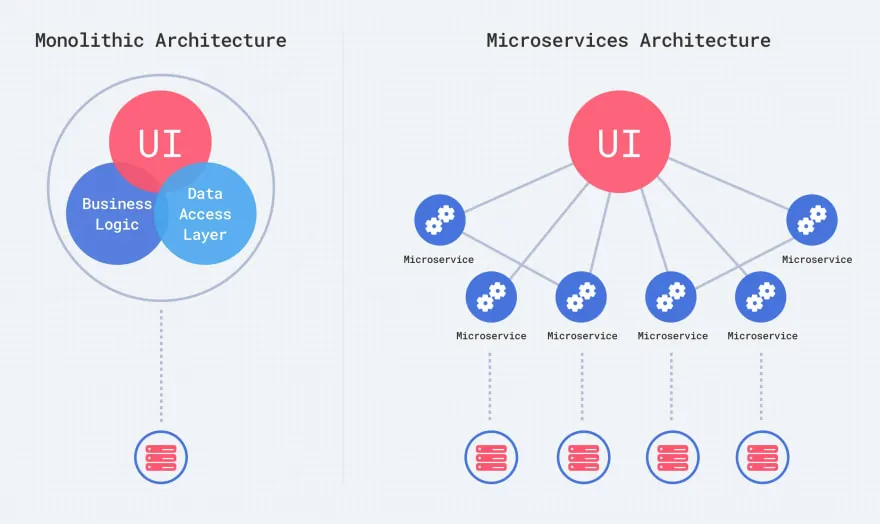
A microservice is a small, independent, deployable application that focuses on a single business capability. Unlike a monolithic application where all features live in one codebase, microservices split the system into small autonomous services.
A simple e-commerce application with two microservices:
| Service | Responsibility |
|---|---|
product-service |
Manage products (add, list) |
cart-service |
Manage the shopping cart (add, list, delete items) |
| # | Scenario | Service |
|---|---|---|
| 1 | Add one or many products to the database | product-service |
| 2 | Get the product list | product-service |
| 3 | Add a product to the cart | cart-service |
| 4 | Get cart products | cart-service |
| 5 | Delete a product from the cart | cart-service |
| 6 | Delete all products from the cart | cart-service |
| Component | Role |
|---|---|
| ActiveMQ | Message broker — allows product-service to notify cart-service when a product is created or updated |
| API Gateway | Single entry point — routes client requests to the correct microservice |
| Eureka Server | Service discovery — services register themselves, and the gateway looks them up dynamically |
We intentionally keep Eureka for the last step. This way, you will first experience the pain of hardcoding service URLs, and then understand why dynamic service discovery is needed.
                        ┌──────────────┐
                        │   Client     │
                        │ (Postman)    │
                        └──────┬───────┘
                               │
                        ┌──────▼───────┐
                        │  API Gateway │
                        │  (port 8080) │
                        └──┬───────┬───┘
                           │       │
              ┌────────────▼─┐   ┌─▼────────────┐
              │product-service│   │ cart-service  │
              │  (port 8081)  │   │  (port 8082)  │
              │   [H2 DB]    │   │   [H2 DB]     │
              └──────┬───────┘   └───────▲───────┘
                     │                   │
                     │   ┌───────────┐   │
                     └──►│ ActiveMQ  │───┘
                         │(port 61616│
                         └───────────┘
Each microservice has its own H2 in-memory database — this is a key principle: database per service.
- Open IntelliJ IDEA
- Go to File → New → Project
- Select Spring Initializr (on the left panel)
- Fill in:
- Group:
com.ecommerce - Artifact:
product-service - Name:
product-service - Packaging: Jar
- Java version: 17
- Group:
- Click Next and add the following dependencies:
- ✅ Spring Web
- ✅ Spring Data JPA
- ✅ H2 Database
- ✅ Spring Boot DevTools
- Click Create
💡 IntelliJ Tip: If you don't see Spring Initializr, make sure you have the "Spring" plugin enabled in Settings → Plugins.
After creation, your project should look like this:
product-service/
├── src/
│   ├── main/
│   │   ├── java/com/ecommerce/productservice/
│   │   │   └── ProductServiceApplication.java
│   │   └── resources/
│   │       └── application.properties
│   └── test/
├── pom.xml
Open src/main/resources/application.properties and add:
# Server port
server.port=8081

# Application name
spring.application.name=product-service

# H2 Database Configuration
spring.datasource.url=jdbc:h2:mem:productdb
spring.datasource.driverClassName=org.h2.Driver
spring.datasource.username=sa
spring.datasource.password=

# JPA Configuration
spring.jpa.database-platform=org.hibernate.dialect.H2Dialect
spring.jpa.hibernate.ddl-auto=update
spring.jpa.show-sql=true

# Enable H2 Console (accessible at http://localhost:8081/h2-console)
spring.h2.console.enabled=true
spring.h2.console.path=/h2-console
💡 What is H2? H2 is an in-memory database. It's perfect for development and testing because it doesn't require installation. The data disappears when the application stops.
🧪 Try it: After starting the app, visit
http://localhost:8081/h2-console. Use JDBC URLjdbc:h2:mem:productdbto connect.
Create a new package model inside com.ecommerce.productservice, then create the class:
package com.ecommerce.productservice.model;

import jakarta.persistence.*;

@Entity
@Table(name = "products")
public class Product {

    @Id
    @GeneratedValue(strategy = GenerationType.IDENTITY)
    private Long id;

    @Column(nullable = false)
    private String name;

    @Column(nullable = false)
    private Double price;

    private String description;

    // Default constructor (required by JPA)
    public Product() {}

    // Constructor with fields
    public Product(String name, Double price, String description) {
        this.name = name;
        this.price = price;
        this.description = description;
    }

    // Getters and Setters
    public Long getId() { return id; }
    public void setId(Long id) { this.id = id; }

    public String getName() { return name; }
    public void setName(String name) { this.name = name; }

    public Double getPrice() { return price; }
    public void setPrice(Double price) { this.price = price; }

    public String getDescription() { return description; }
    public void setDescription(String description) { this.description = description; }
}
📝 Explanation:
@Entitytells JPA this class maps to a database table@Id+@GeneratedValuemakeidan auto-incremented primary key@Column(nullable = false)ensures the field cannot be null in the database
Create a new package repository:
package com.ecommerce.productservice.repository;

import com.ecommerce.productservice.model.Product;
import org.springframework.data.jpa.repository.JpaRepository;
import org.springframework.stereotype.Repository;

@Repository
public interface ProductRepository extends JpaRepository<Product, Long> {
    // JpaRepository provides: save(), findAll(), findById(), deleteById(), etc.
    // No need to write any SQL!
}
📝 Explanation: By extending
JpaRepository<Product, Long>, Spring Data JPA automatically generates the implementation for common CRUD operations.Productis the entity type,Longis the type of the primary key.
Create a new package service:
package com.ecommerce.productservice.service;

import com.ecommerce.productservice.model.Product;
import com.ecommerce.productservice.repository.ProductRepository;
import org.springframework.stereotype.Service;

import java.util.List;

@Service
public class ProductService {

    private final ProductRepository productRepository;

    // Constructor injection (recommended over @Autowired on fields)
    public ProductService(ProductRepository productRepository) {
        this.productRepository = productRepository;
    }

    /**
     * Save a single product
     */
    public Product addProduct(Product product) {
        return productRepository.save(product);
    }

    /**
     * Save multiple products at once
     */
    public List<Product> addProducts(List<Product> products) {
        return productRepository.saveAll(products);
    }

    /**
     * Get all products
     */
    public List<Product> getAllProducts() {
        return productRepository.findAll();
    }

    /**
     * Find a product by ID
     */
    public Product getProductById(Long id) {
        return productRepository.findById(id)
                .orElseThrow(() -> new RuntimeException("Product not found with id: " + id));
    }
}Create a new package controller:
package com.ecommerce.productservice.controller;

import com.ecommerce.productservice.model.Product;
import com.ecommerce.productservice.service.ProductService;
import org.springframework.http.HttpStatus;
import org.springframework.http.ResponseEntity;
import org.springframework.web.bind.annotation.*;

import java.util.List;

@RestController
@RequestMapping("/api/products")
public class ProductController {

    private final ProductService productService;

    public ProductController(ProductService productService) {
        this.productService = productService;
    }

    /**
     * POST /api/products
     * Add a single product
     * Body: { "name": "Laptop", "price": 999.99, "description": "A powerful laptop" }
     */
    @PostMapping
    public ResponseEntity<Product> addProduct(@RequestBody Product product) {
        Product savedProduct = productService.addProduct(product);
        return new ResponseEntity<>(savedProduct, HttpStatus.CREATED);
    }

    /**
     * POST /api/products/batch
     * Add multiple products at once
     * Body: [ { "name": "Laptop", ... }, { "name": "Phone", ... } ]
     */
    @PostMapping("/batch")
    public ResponseEntity<List<Product>> addProducts(@RequestBody List<Product> products) {
        List<Product> savedProducts = productService.addProducts(products);
        return new ResponseEntity<>(savedProducts, HttpStatus.CREATED);
    }

    /**
     * GET /api/products
     * Get all products
     */
    @GetMapping
    public ResponseEntity<List<Product>> getAllProducts() {
        List<Product> products = productService.getAllProducts();
        return ResponseEntity.ok(products);
    }

    /**
     * GET /api/products/{id}
     * Get a single product by ID
     */
    @GetMapping("/{id}")
    public ResponseEntity<Product> getProductById(@PathVariable Long id) {
        Product product = productService.getProductById(id);
        return ResponseEntity.ok(product);
    }
}- Run the application: Right-click
ProductServiceApplication.java→ Run - Open Postman (or use
curl)
Test 1: Add a single product
POST http://localhost:8081/api/products
Content-Type: application/json

{
    "name": "Laptop HP",
    "price": 1299.99,
    "description": "HP Pavilion 15 - 16GB RAM"
}
Expected response (201 Created):
{
    "id": 1,
    "name": "Laptop HP",
    "price": 1299.99,
    "description": "HP Pavilion 15 - 16GB RAM"
}
Test 2: Add multiple products
POST http://localhost:8081/api/products/batch
Content-Type: application/json

[
    { "name": "iPhone 15", "price": 999.99, "description": "Apple iPhone 15 Pro" },
    { "name": "Samsung Galaxy S24", "price": 899.99, "description": "Samsung flagship" },
    { "name": "AirPods Pro", "price": 249.99, "description": "Wireless earbuds" }
]
Test 3: Get all products
GET http://localhost:8081/api/products
✅ Checkpoint: You should see all 4 products returned. If yes, move to Step 2!
- Open IntelliJ IDEA → File → New → Project (or New Module if using a multi-module setup)
- Select Spring Initializr
- Fill in:
- Group:
com.ecommerce - Artifact:
cart-service - Name:
cart-service
- Group:
- Add dependencies:
- ✅ Spring Web
- ✅ Spring Data JPA
- ✅ H2 Database
- ✅ Spring Boot DevTools
- Click Create
Open src/main/resources/application.properties:
# Server port (different from product-service!)
server.port=8082

# Application name
spring.application.name=cart-service

# H2 Database Configuration — SEPARATE database!
spring.datasource.url=jdbc:h2:mem:cartdb
spring.datasource.driverClassName=org.h2.Driver
spring.datasource.username=sa
spring.datasource.password=

# JPA Configuration
spring.jpa.database-platform=org.hibernate.dialect.H2Dialect
spring.jpa.hibernate.ddl-auto=update
spring.jpa.show-sql=true

# H2 Console
spring.h2.console.enabled=true
spring.h2.console.path=/h2-console
🔑 Key point: Notice that
spring.datasource.urlisjdbc:h2:mem:cartdb— a different database thanproductdb. Each microservice owns its data!
package com.ecommerce.cartservice.model;

import jakarta.persistence.*;

@Entity
@Table(name = "cart_items")
public class CartItem {

    @Id
    @GeneratedValue(strategy = GenerationType.IDENTITY)
    private Long id;

    @Column(nullable = false)
    private Long productId;

    @Column(nullable = false)
    private String productName;

    @Column(nullable = false)
    private Double productPrice;

    @Column(nullable = false)
    private Integer quantity;

    public CartItem() {}

    public CartItem(Long productId, String productName, Double productPrice, Integer quantity) {
        this.productId = productId;
        this.productName = productName;
        this.productPrice = productPrice;
        this.quantity = quantity;
    }

    // Getters and Setters
    public Long getId() { return id; }
    public void setId(Long id) { this.id = id; }

    public Long getProductId() { return productId; }
    public void setProductId(Long productId) { this.productId = productId; }

    public String getProductName() { return productName; }
    public void setProductName(String productName) { this.productName = productName; }

    public Double getProductPrice() { return productPrice; }
    public void setProductPrice(Double productPrice) { this.productPrice = productPrice; }

    public Integer getQuantity() { return quantity; }
    public void setQuantity(Integer quantity) { this.quantity = quantity; }
}
📝 Why do we store
productNameandproductPricehere? Because in microservices, each service is autonomous. The cart-service cannot query the product-service's database directly. We denormalize the data to avoid tight coupling.
package com.ecommerce.cartservice.repository;

import com.ecommerce.cartservice.model.CartItem;
import org.springframework.data.jpa.repository.JpaRepository;
import org.springframework.stereotype.Repository;

import java.util.Optional;

@Repository
public interface CartItemRepository extends JpaRepository<CartItem, Long> {

    Optional<CartItem> findByProductId(Long productId);

    void deleteByProductId(Long productId);
}package com.ecommerce.cartservice.service;
import com.ecommerce.cartservice.model.CartItem;
import com.ecommerce.cartservice.repository.CartItemRepository;
import org.springframework.stereotype.Service;
import org.springframework.transaction.annotation.Transactional;
import java.util.List;
import java.util.Optional;
@Service
public class CartService {
private final CartItemRepository cartItemRepository;
public CartService(CartItemRepository cartItemRepository) {
this.cartItemRepository = cartItemRepository;
}
/**
* Add a product to the cart.
* If the product already exists, increment the quantity.
*/
public CartItem addToCart(CartItem cartItem) {
Optional<CartItem> existingItem = cartItemRepository.findByProductId(cartItem.getProductId());
if (existingItem.isPresent()) {
CartItem item = existingItem.get();
item.setQuantity(item.getQuantity() + cartItem.getQuantity());
return cartItemRepository.save(item);
}
return cartItemRepository.save(cartItem);
}
/**
* Get all items in the cart
*/
public List<CartItem> getCartItems() {
return cartItemRepository.findAll();
}
/**
* Remove a specific product from the cart
*/
@Transactional
public void removeFromCart(Long productId) {
cartItemRepository.deleteByProductId(productId);
}
/**
* Clear the entire cart
*/
public void clearCart() {
cartItemRepository.deleteAll();
}
}Create a package dto:
package com.ecommerce.cartservice.dto;

public class AddToCartRequest {

    private Long productId;
    private String productName;
    private Double productPrice;
    private Integer quantity;

    public AddToCartRequest() {}

    // Getters and Setters
    public Long getProductId() { return productId; }
    public void setProductId(Long productId) { this.productId = productId; }

    public String getProductName() { return productName; }
    public void setProductName(String productName) { this.productName = productName; }

    public Double getProductPrice() { return productPrice; }
    public void setProductPrice(Double productPrice) { this.productPrice = productPrice; }

    public Integer getQuantity() { return quantity; }
    public void setQuantity(Integer quantity) { this.quantity = quantity; }
}package com.ecommerce.cartservice.controller;
import com.ecommerce.cartservice.dto.AddToCartRequest;
import com.ecommerce.cartservice.model.CartItem;
import com.ecommerce.cartservice.service.CartService;
import org.springframework.http.HttpStatus;
import org.springframework.http.ResponseEntity;
import org.springframework.web.bind.annotation.*;
import java.util.List;
@RestController
@RequestMapping("/api/cart")
public class CartController {
private final CartService cartService;
public CartController(CartService cartService) {
this.cartService = cartService;
}
/**
* POST /api/cart
* Add a product to the cart
*/
@PostMapping
public ResponseEntity<CartItem> addToCart(@RequestBody AddToCartRequest request) {
CartItem cartItem = new CartItem(
request.getProductId(),
request.getProductName(),
request.getProductPrice(),
request.getQuantity()
);
CartItem savedItem = cartService.addToCart(cartItem);
return new ResponseEntity<>(savedItem, HttpStatus.CREATED);
}
/**
* GET /api/cart
* Get all items in the cart
*/
@GetMapping
public ResponseEntity<List<CartItem>> getCartItems() {
List<CartItem> items = cartService.getCartItems();
return ResponseEntity.ok(items);
}
/**
* DELETE /api/cart/{productId}
* Remove a specific product from the cart
*/
@DeleteMapping("/{productId}")
public ResponseEntity<String> removeFromCart(@PathVariable Long productId) {
cartService.removeFromCart(productId);
return ResponseEntity.ok("Product " + productId + " removed from cart");
}
/**
* DELETE /api/cart
* Clear the entire cart
*/
@DeleteMapping
public ResponseEntity<String> clearCart() {
cartService.clearCart();
return ResponseEntity.ok("Cart cleared successfully");
}
}- Run the
CartServiceApplication - Make sure
product-serviceis still running on port 8081
Test 1: Add a product to the cart
POST http://localhost:8082/api/cart
Content-Type: application/json

{
    "productId": 1,
    "productName": "Laptop HP",
    "productPrice": 1299.99,
    "quantity": 1
}
Test 2: Add another product
POST http://localhost:8082/api/cart
Content-Type: application/json

{
    "productId": 2,
    "productName": "iPhone 15",
    "productPrice": 999.99,
    "quantity": 2
}
Test 3: Get cart contents
GET http://localhost:8082/api/cart
Test 4: Delete a specific product from cart
DELETE http://localhost:8082/api/cart/1
Test 5: Delete all products from cart
DELETE http://localhost:8082/api/cart
✅ Checkpoint: All 5 cart operations work? Great! But notice something: the two services don't communicate at all yet. When a product is added to
product-service,cart-servicedoesn't know about it. Let's fix that!
Right now, our two services are completely isolated. In a real e-commerce app, when a product is created or its price changes, the cart-service should be notified.
Two approaches for inter-service communication:
| Approach | Type | Example |
|---|---|---|
| REST call (HTTP) | Synchronous | cart-service calls product-service API directly |
| Message broker | Asynchronous | product-service publishes a message, cart-service consumes it |
We use ActiveMQ (a message broker) because:
- ✅ Services are decoupled — they don't need to know each other's URLs
- ✅ Fault tolerant — if
cart-serviceis down, messages wait in the queue - ✅ Scalable — multiple consumers can read from the same queue
- Download ActiveMQ Classic from: https://activemq.apache.org/components/classic/download/
- Extract the archive
- Start ActiveMQ:
- Windows: Run
bin\win64\activemq.bat start - macOS/Linux: Run
./bin/activemq start
- Windows: Run
- Verify: Open http://localhost:8161 in your browser
- Login:
admin/admin - You should see the ActiveMQ web console
- Login:
💡 Alternative (Docker): If you have Docker:
docker run -d --name activemq -p 61616:61616 -p 8161:8161 apache/activemq-classic:latest
Add the following dependency to the pom.xml of both product-service and cart-service:
<dependency>
    <groupId>org.springframework.boot</groupId>
    <artifactId>spring-boot-starter-activemq</artifactId>
</dependency>
📝 After adding this, click the Maven reload icon 🔄 in IntelliJ (or right-click
pom.xml→ Maven → Reload Project).
Add to application.properties of both services:
# ActiveMQ Configuration
spring.activemq.broker-url=tcp://localhost:61616
spring.activemq.user=admin
spring.activemq.password=adminWhen a product is created, product-service will send a message to a queue called product-queue.
Create the message producer in product-service:
package com.ecommerce.productservice.messaging;

import com.ecommerce.productservice.model.Product;
//import com.fasterxml.jackson.core.JsonProcessingException;
//import com.fasterxml.jackson.databind.ObjectMapper;
//import org.springframework.boot.json.JsonParseException;
import org.springframework.jms.core.JmsTemplate;
import org.springframework.stereotype.Component;
import tools.jackson.databind.ObjectMapper;
import tools.jackson.databind.exc.JsonNodeException;

@Component
public class ProductMessageProducer {

    private final JmsTemplate jmsTemplate;
    private final ObjectMapper objectMapper;

    public ProductMessageProducer(JmsTemplate jmsTemplate, ObjectMapper objectMapper) {
        this.jmsTemplate = jmsTemplate;
        this.objectMapper = objectMapper;
    }

    /**
     * Send product information to the "product-queue"
     */
    public void sendProductMessage(Product product) {
        try {
            String productJson = objectMapper.writeValueAsString(product);
            jmsTemplate.convertAndSend("product-queue", productJson);
            System.out.println("📤 Message sent to product-queue: " + productJson);
        } catch (JsonNodeException e) {
            System.err.println("❌ Error serializing product: " + e.getMessage());
        }
    }
}
📝 Explanation:
JmsTemplateis Spring's helper to send JMS messages- We convert the
Productobject to JSON (String) before sending"product-queue"is the name of our message queue
Update the ProductService to send a message after saving:
package com.ecommerce.productservice.service;

import com.ecommerce.productservice.messaging.ProductMessageProducer;
import com.ecommerce.productservice.model.Product;
import com.ecommerce.productservice.repository.ProductRepository;
import org.springframework.stereotype.Service;

import java.util.List;

@Service
public class ProductService {

    private final ProductRepository productRepository;
    private final ProductMessageProducer messageProducer;

    public ProductService(ProductRepository productRepository, ProductMessageProducer messageProducer) {
        this.productRepository = productRepository;
        this.messageProducer = messageProducer;
    }

    public Product addProduct(Product product) {
        Product savedProduct = productRepository.save(product);
        // 🔔 Notify other services via ActiveMQ
        messageProducer.sendProductMessage(savedProduct);
        return savedProduct;
    }

    public List<Product> addProducts(List<Product> products) {
        List<Product> savedProducts = productRepository.saveAll(products);
        // 🔔 Notify for each product
        savedProducts.forEach(messageProducer::sendProductMessage);
        return savedProducts;
    }

    public List<Product> getAllProducts() {
        return productRepository.findAll();
    }

    public Product getProductById(Long id) {
        return productRepository.findById(id)
                .orElseThrow(() -> new RuntimeException("Product not found with id: " + id));
    }
}cart-service will listen to the product-queue and log received product information.
Create a DTO for the product message in cart-service:
package com.ecommerce.cartservice.dto;

public class ProductMessage {

    private Long id;
    private String name;
    private Double price;
    private String description;

    public ProductMessage() {}

    // Getters and Setters
    public Long getId() { return id; }
    public void setId(Long id) { this.id = id; }

    public String getName() { return name; }
    public void setName(String name) { this.name = name; }

    public Double getPrice() { return price; }
    public void setPrice(Double price) { this.price = price; }

    public String getDescription() { return description; }
    public void setDescription(String description) { this.description = description; }

    @Override
    public String toString() {
        return "ProductMessage{id=" + id + ", name='" + name + "', price=" + price + "}";
    }
}
Create the message consumer:
package com.ecommerce.cartservice.messaging;

import com.ecommerce.cartservice.dto.ProductMessage;
//import com.fasterxml.jackson.core.JsonProcessingException;
//import com.fasterxml.jackson.databind.ObjectMapper;
//import org.springframework.boot.json.JsonParseException;
import org.springframework.jms.annotation.JmsListener;
import org.springframework.stereotype.Component;
import tools.jackson.databind.ObjectMapper;
import tools.jackson.databind.exc.JsonNodeException;

@Component
public class ProductMessageConsumer {

    private final ObjectMapper objectMapper;

    public ProductMessageConsumer(ObjectMapper objectMapper) {
        this.objectMapper = objectMapper;
    }

    /**
     * Listen to "product-queue" and process incoming product messages
     */
    @JmsListener(destination = "product-queue")
    public void receiveProductMessage(String message) {
        try {
            ProductMessage product = objectMapper.readValue(message, ProductMessage.class);
            System.out.println("📥 Received product message: " + product);
            System.out.println("   → Product '" + product.getName() + "' is now available (price: " + product.getPrice() + "€)");
            // In a real app, you could cache this product info locally
            // or update cart prices if a product price changed
        } catch (JsonNodeException e) {
            System.err.println("❌ Error deserializing product message: " + e.getMessage());
        }
    }
}
📝 Explanation:
@JmsListener(destination = "product-queue")— this method is automatically called whenever a new message arrives in the queue- Spring handles threading, connection management, and acknowledgment
- Make sure ActiveMQ is running
- Restart both
product-serviceandcart-service - Add a new product:
POST http://localhost:8081/api/products
Content-Type: application/json

{
    "name": "MacBook Pro",
    "price": 2499.99,
    "description": "Apple MacBook Pro M3"
}
- Check the console of
cart-service— you should see:
📥 Received product message: ProductMessage{id=1, name='MacBook Pro', price=2499.99}
   → Product 'MacBook Pro' is now available (price: 2499.99€)
- Check ActiveMQ console at http://localhost:8161 → Queues → You should see
product-queuewith messages enqueued/dequeued.
✅ Checkpoint: The two services now communicate asynchronously! The
product-servicedoesn't need to know wherecart-serviceis — it just sends a message to the broker.
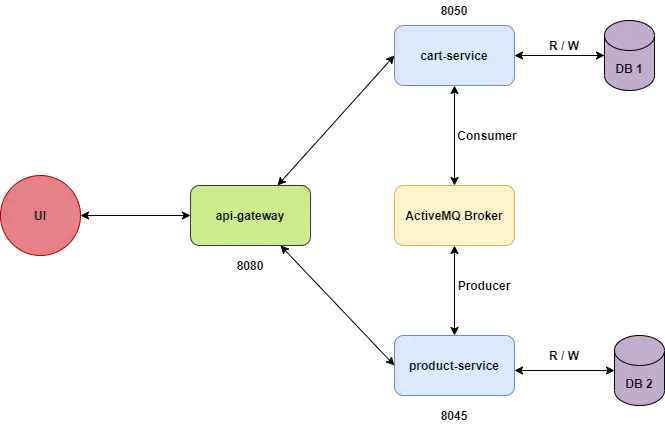
Right now, the client needs to know:
- Product service is at
localhost:8081 - Cart service is at
localhost:8082
Problems:
- ❌ The client needs to know every service's address and port
- ❌ If we add more services, the client code must change
- ❌ No centralized security, logging, or rate limiting
Solution: An API Gateway acts as a single entry point. The client only talks to the gateway!
- File → New → Project → Spring Initializr
- Fill in:
- Group:
com.ecommerce - Artifact:
api-gateway - Name:
api-gateway
- Group:
- Dependencies:
- ✅ Gateway (Spring Cloud Routing → Gateway)
⚠️ Make sure to select Spring Cloud Gateway (reactive), not Spring MVC.
Open src/main/resources/application.properties (or use application.yml — we'll use .yml here for clarity):
Create/rename to application.yml:
server:
  port: 8080

spring:
  application:
    name: api-gateway
  cloud:
    gateway:
      server:
        webmvc:
          routes:
              # Route to product-service
              - id: product-service
                uri: http://localhost:8081
                predicates:
                  - Path=/api/products/**

              # Route to cart-service
              - id: cart-service
                uri: http://localhost:8082
                predicates:
                  - Path=/api/cart/**
📝 Explanation:
- All requests to
http://localhost:8080/api/products/**are forwarded tohttp://localhost:8081/api/products/**- All requests to
http://localhost:8080/api/cart/**are forwarded tohttp://localhost:8082/api/cart/**- The client only knows about port
8080!
- Start the
api-gatewayapplication - Now use port 8080 for ALL requests:
GET http://localhost:8080/api/products
POST http://localhost:8080/api/cart
GET http://localhost:8080/api/cart
DELETE http://localhost:8080/api/cart/1
✅ Checkpoint: Everything works through port 8080! But notice — we hardcoded
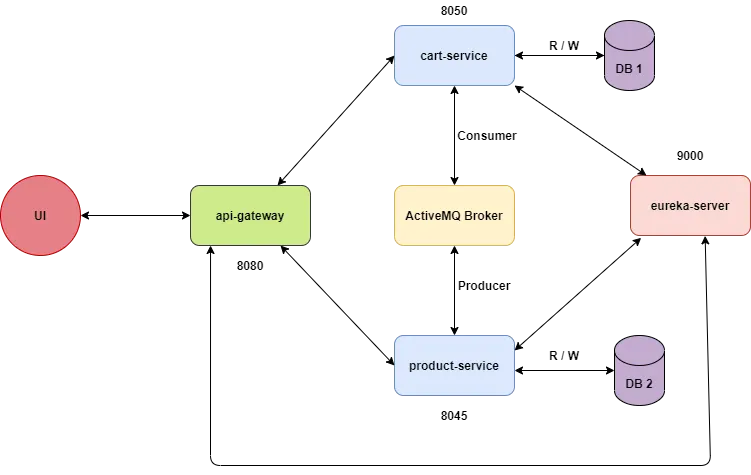
localhost:8081andlocalhost:8082in the gateway config. What if a service changes port? What if we run multiple instances? That's what Eureka solves!
Ask yourself these questions:
- What happens if
product-servicemoves to port9091instead of8081?- → You must update the gateway config and restart it ❌
- What if you run 3 instances of
product-servicefor load balancing?- → The gateway doesn't know about the other instances ❌
- What if a service crashes?
- → The gateway still tries to route to it ❌
Eureka solves all of this! Each service registers itself with Eureka. The gateway asks Eureka where services are. If a service dies, Eureka removes it.
Before Eureka:                    After Eureka:

Client → Gateway → hardcoded URL  Client → Gateway → asks Eureka → routes dynamically
- File → New → Project → Spring Initializr
- Fill in:
- Group:
com.ecommerce - Artifact:
eureka-server - Name:
eureka-server
- Group:
- Dependencies:
- ✅ Eureka Server (Spring Cloud Discovery → Eureka Server)
Main Application Class — Add @EnableEurekaServer:
package com.ecommerce.eurekaserver;

import org.springframework.boot.SpringApplication;
import org.springframework.boot.autoconfigure.SpringBootApplication;
import org.springframework.cloud.netflix.eureka.server.EnableEurekaServer;

@SpringBootApplication
@EnableEurekaServer
public class EurekaServerApplication {
    public static void main(String[] args) {
        SpringApplication.run(EurekaServerApplication.class, args);
    }
}
application.properties:
server.port=8761

spring.application.name=eureka-server

# Don't register itself as a client
eureka.client.register-with-eureka=false
eureka.client.fetch-registry=false
Start the Eureka Server and visit: http://localhost:8761
You should see the Eureka Dashboard — currently with no registered services.
Add dependency to product-service/pom.xml:
<dependency>
    <groupId>org.springframework.cloud</groupId>
    <artifactId>spring-cloud-starter-netflix-eureka-client</artifactId>
</dependency>
You also need to add Spring Cloud BOM (Bill of Materials) in the <dependencyManagement> section. Add this to pom.xml if it's not already there:
<properties>
    <spring-cloud.version>2024.0.0</spring-cloud.version>
</properties>

<dependencyManagement>
    <dependencies>
        <dependency>
            <groupId>org.springframework.cloud</groupId>
            <artifactId>spring-cloud-dependencies</artifactId>
            <version>${spring-cloud.version}</version>
            <type>pom</type>
            <scope>import</scope>
        </dependency>
    </dependencies>
</dependencyManagement>
⚠️ Match the Spring Cloud version to your Spring Boot version. Check https://spring.io/projects/spring-cloud for compatibility.
Add to application.properties:
# Eureka Client Configuration
eureka.client.service-url.defaultZone=http://localhost:8761/eureka/
eureka.instance.prefer-ip-address=trueRepeat the exact same steps as 5.4 for cart-service:
- Add
spring-cloud-starter-netflix-eureka-clientdependency - Add Spring Cloud BOM
- Add Eureka client config to
application.properties
Add Eureka client to api-gateway/pom.xml (same dependency as above).
Update application.yml to use service names instead of hardcoded URLs:
server:
  port: 8080

spring:
  application:
    name: api-gateway
  cloud:
    gateway:
      server:
        webmvc:
          routes:
            # Route to product-service (using Eureka service name!)
            - id: product-service
              uri: lb://product-service
              predicates:
                - Path=/api/products/**

            # Route to cart-service (using Eureka service name!)
            - id: cart-service
              uri: lb://cart-service
              predicates:
                - Path=/api/cart/**

eureka:
  client:
    service-url:
      defaultZone: http://localhost:8761/eureka/
📝 Key change:
uri: http://localhost:8081→uri: lb://product-service
lb://means load-balanced — the gateway asks Eureka for the addressproduct-servicematches thespring.application.namein that service's config
Start order:
- 🟢 Eureka Server (port 8761) — start first, wait for it to be ready
- 🟢 product-service (port 8081)
- 🟢 cart-service (port 8082)
- 🟢 api-gateway (port 8080)
Check Eureka Dashboard: http://localhost:8761
You should see:
| Application | Status |
|---|---|
| PRODUCT-SERVICE | UP (1) |
| CART-SERVICE | UP (1) |
| API-GATEWAY | UP (1) |
Test through the gateway (same as before):
# Add a product (goes through gateway → Eureka → product-service)
POST http://localhost:8080/api/products
Content-Type: application/json

{
    "name": "Wireless Mouse",
    "price": 29.99,
    "description": "Logitech wireless mouse"
}

# Check cart-service console for ActiveMQ message!

# Get all products
GET http://localhost:8080/api/products

# Add to cart
POST http://localhost:8080/api/cart
Content-Type: application/json

{
    "productId": 1,
    "productName": "Wireless Mouse",
    "productPrice": 29.99,
    "quantity": 3
}

# Get cart
GET http://localhost:8080/api/cart
Experiment 1: Kill and restart a service
- Stop
product-service - Wait 30 seconds
- Check Eureka Dashboard —
PRODUCT-SERVICEshould show as DOWN - Try
GET http://localhost:8080/api/products— you'll get an error (503) - Restart
product-service— it re-registers automatically!
Experiment 2: Run multiple instances
- In IntelliJ, go to Run → Edit Configurations
- Duplicate
ProductServiceApplication - Add VM option:
-Dserver.port=8083 - Run both instances
- Check Eureka — you'll see
PRODUCT-SERVICEwith UP (2) - The gateway automatically load-balances between them!
Execute this full scenario through the gateway (http://localhost:8080):
1. POST /api/products/batch       → Add 3 products
2. GET  /api/products             → Verify all 3 exist
3. POST /api/cart                 → Add product 1 to cart (qty: 2)
4. POST /api/cart                 → Add product 2 to cart (qty: 1)
5. GET  /api/cart                 → See 2 items in cart
6. DELETE /api/cart/1             → Remove product 1
7. GET  /api/cart                 → Only product 2 remains
8. DELETE /api/cart               → Clear cart
9. GET  /api/cart                 → Empty cart []
Also check:
- ✅ ActiveMQ console (http://localhost:8161) — messages were sent
- ✅ Cart-service console — messages were received
- ✅ Eureka dashboard (http://localhost:8761) — all services registered
- ✅ H2 console for product-service (http://localhost:8081/h2-console)
- ✅ H2 console for cart-service (http://localhost:8082/h2-console)
| Component | Role | Port |
|---|---|---|
| Eureka Server | Service registry — services register here, gateway looks them up | 8761 |
| API Gateway | Single entry point — routes requests to correct service | 8080 |
| Product Service | Manages products + sends messages to ActiveMQ | 8081 |
| Cart Service | Manages cart + receives messages from ActiveMQ | 8082 |
| ActiveMQ | Message broker — async communication between services | 61616 / 8161 |
| Concept | What you learned |
|---|---|
| Microservices | Split a monolith into independent services with separate databases |
| Database per Service | Each service owns its data (H2 productdb vs cartdb) |
| Asynchronous Messaging | Services communicate via ActiveMQ without direct coupling |
| API Gateway | Single entry point for clients, hides service topology |
| Service Discovery | Eureka eliminates hardcoded URLs, enables dynamic routing |
| Load Balancing | lb:// prefix in gateway enables client-side load balancing |
-
Why didn't we use a single shared database? → Microservice independence, scalability, different data models per service.
-
What would happen if ActiveMQ goes down? → Messages would be lost (unless we configure persistence). The services still work independently.
-
How would you add authentication? → Add Spring Security to the API Gateway — centralized authentication.
-
How would you extend this to include an
order-service? → New microservice, new database, listens to cart events, produces order events.
ecommerce-microservices/
│
├── eureka-server/               (port 8761)
│   └── src/main/java/.../EurekaServerApplication.java
│
├── api-gateway/                 (port 8080)
│   └── src/main/resources/application.yml
│
├── product-service/             (port 8081)
│   └── src/main/java/.../
│       ├── model/Product.java
│       ├── repository/ProductRepository.java
│       ├── service/ProductService.java
│       ├── controller/ProductController.java
│       └── messaging/ProductMessageProducer.java
│
├── cart-service/                (port 8082)
│   └── src/main/java/.../
│       ├── model/CartItem.java
│       ├── repository/CartItemRepository.java
│       ├── service/CartService.java
│       ├── controller/CartController.java
│       ├── dto/AddToCartRequest.java
│       ├── dto/ProductMessage.java
│       └── messaging/ProductMessageConsumer.java
🎉 Congratulations! You have successfully built a microservices-based e-commerce application with:
- Two independent services with separate databases
- Asynchronous messaging with ActiveMQ
- Centralized routing with API Gateway
- Dynamic service discovery with Eureka
Bon courage ! 🚀