This document is intended for data wranglers. Prior to running any pipelines, wranglers should be familiar with the following concepts:
- What types of data are generated by their assigned labs
- How to navigate the ENCODE portal
- How to use the command line
- How to access our private GCP project(s)
-
Generate a list of all unreleased, unprocessed datasets
For your assigned lab, construct a query for the unreleased, unprocessed datasets. An example of such a query is:
https://www.encodeproject.org/search/?type=Experiment&audit.WARNING.category=lacking+processed+data&status=in+progress&status=submitted&lab.title=Ann Smith, UniversityFrom the Report view, download a .tsv list of dataset accessions.
-
Review datasets and filter out any datasets not ready for processing
Depending on the lab and assay in question, there may be more specific requirements necessary before proceeding to data processing. Wranglers should consult with their lab to ensure all requirements are met. Below is a non-exclusive list of common requirements you may need to check:
- Are all replicates submitted? Does the lab plan to add any additional data to this dataset in the future?
- Is the dataset flagged with any audits?
- If so, can these audits be quickly resolved?
- For pipelines which require adapter specification, is adapter metadata present on the associated Library objects?
- For pipelines which require control alignment files, has the control been processed and uploaded to the portal?
Remove any datasets which do not meet the qualifications from the list of dataset accessions.
-
Create a Jira ticket to track the dataset processing
Create a ticket in the Production project for the batch of datasets to be processed. The ticket title should include the assay name, the number of datasets, and the lab name if relevant. In the ticket description, include a portal query leading to a search result page for the datasets in question which can be accessed for future reference. An example of a query is:
https://www.encodeproject.org/search/?type=Experiment&accession=ENCSR000ABC&accession=ENCSR111DEF
-
Clone the pyencoded-tools repository
If you have not already done so, clone the pyencoded-tools repository, which includes all scripts used to generate pipeline input files. Open a Terminal, then navigate to the directory where you will clone the repository.
$ cd ./GitClones $ git clone https://github.com/ENCODE-DCC/pyencoded-tools.git -
Prepare an input .txt file for the script(s) used to generate pipeline input .json files and corresponding bash file
Due to the varying specifications of each pipeline, the scripts for generating input .json files are also pipeline-specific. As such, the help documentation of each individual script should be consulted for more specific instructions. In all cases, the input .txt file must contain a column for accessions. Additional required columns vary depending on the script, but may include columns for parameters such as
align_only,force_se, orcustom_message. -
Run the script
Certain scripts have optional arguments, which are described in further detail in each script's help documentation. With a properly formatted input .txt file, the command to run the script typically resembles the following:
python generate_chip_input_json.py -i ~/list_of_accessions.txt -g gs://processing-bucket/my-folder/JIRA-123 --wdl /path/to/pipeline.wdl -o /Users/myfolder/input_files -s https://www.encodeproject.orgThe arguments used in the above are:
Argument Description -i[Required] Path to the input .txt file on your local machine produced in step 5. -g[Required] Google Cloud URI to the bucket folder where the pipeline input files will be stored. --wdl[Required] Path to the .wdl file of the pipeline on the GCP machine. Consult with a pipeline developer if unsure of the correct path. -o[Optional] Path to a directory on your local machine where the outputs of the script will be stored. Defaults to current directory. -s[Optional] The URL of the ENCODE portal. In rare occasions, this may be replaced with a demo server URL for testing purposes. Defaults to https://www.encodeproject.org/. After running the script, the directory specified in the
-oargument should contain input .json files, and one bash file namedcaper_submit.sh.
-
Upload the input files to the Google Cloud bucket
From the web browser interface, visit the directory where the input .json files will be stored, as specified earlier in step 6 in the
-gargument. Drag and drop the input .json files from your local directory to the Google Cloud directory. Alternatively, click the Upload Files button indicated in the following image.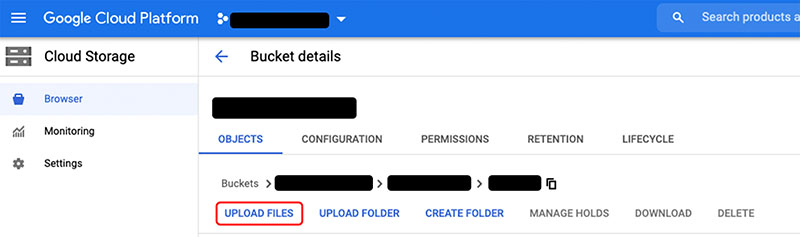
-
SSH to the GCP machine where the pipeline will be run
In the Navigation Menu sidebar of the Google Cloud interface, hover over "Compute Engine" and select "VM instances" in the submenu. The VM instances page displays a list of active machines in our project. Consult with a pipeline developer if you are unsure which machine should be used.
A drop-down selector for SSH options is located in the column 2nd from the right. Click on the selector, then choose "View Gcloud command." Copy this command.
Locally, open your Terminal and run the command.
gcloud beta compute ssh --zone "machine-zone" "machine-name" --project "project-name" -
Create a folder on the machine to store the bash file
For organizational purposes, create a folder on the machine to store the bash file generated in step 6. There is no strict rule on the directory structure; follow an organization that makes sense to you.
$ mkdir pipeline_inputsCopy the contents of the bash file to a file in the newly created directory. Vi can be used for this purpose. Additional guidance on how to use Vi is available in separate documentation.
$ cd pipeline_inputs $ vi caper_commands.sh -
Start a screen session and run the bash file to initiate pipeline runs
Some datasets contain large, multiple gigabyte files, which take a long time to transfer for processing. Wranglers may need to exit the machine to do other work during the submission process. Using a
screenfacilitates this by allowing running processes to continue even when the user is not accessing the machine.Run
screen:$ screenOnce activated, run the bash file, which contains the commands to initiate the pipeline runs, also referred to as "workflows."
$ bash caper_commands.shThe pipeline runs begin as soon as submission of the workflows completes.
-
(Optional) Check pipeline status
The Caper software allows wranglers to check on the status of their workflows using the
caper listcommand.caper listwill return all workflows run on that machine, including past completed runs. Because of this, it is useful to pipe the output ofcaper listto filter it to relevant items. For example, thecustom_messageparameter mentioned in step 5 can be used to "tag" workflows to make them more easily searchable. Ifcustom_messageincluded the Jira ticket number, you could thengrepfor this number:$ caper list | grep JIRA123Additional functionalities of Caper are described in the Caper documentation.
Different pipelines require different lengths of time to complete. Instructions on how to proceed once the runs are complete are available in a follow-up guide.