Welcome to the MBTA Web App project!
You may have used multiple Python libraries to access information on the Internet. For example, praw can get Reddit data by interacting with Reddit's application programming interface (API). In this project, you will access web APIs directly and begin to write your own program to connect with new data sources. Then you will build a simple website containing some webpages with a small amount of dynamic content using the Flask web framework. This website will help people find a nearby MBTA station and other information by providing an address or point of interest. As part of the project, you are encouraged to use AI tools to explore APIs and Python libraries that have not been covered in classes yet.
tl;dr: Build a Flask web app that helps users find the nearest MBTA stop given a place name.
Throughout this project, you'll focus on developing the following skills:
- Connecting to web APIs
- Processing structured data (JSON)
- Web app development using Flask
- Experimenting with AI tools to enhance the learning process and explore new tools and techniques.
- You may work independently or in a team of two.
- Each student (or one team member, if in a team) should fork this template repository to create a new public repository for the project, keeping the template's default name.
- If in a team, add the other member as a collaborator. Both members should follow GitHub collaboration best practices, such as using branches and pull requests for code review. This setup provides access to the code for all team members and supports effective collaboration.
The goal for Part 1 to deal with geographical data. You will write a tool that takes an address or place name and returns the closest MBTA stop and other information about that MBTA stop. For example:
import mbta_helper

print(mbta_helper.find_stop_near("Boston Common"))
# Beacon St opp Walnut StNote: It will be up to you to make this happen. If you feel confident in your ability and enjoy challenges, you can delete mbta_helper.py in the folder and implement it from scratch all by yourself! If you prefer more scaffolding, you can open and read code in mbta_helper.py as a starting point, while reading the following sections.
APIs allow you make requests using specifically constructed URLs and return data in a nicely structured format. There are the three main steps to using any web API:
-
Read the API documentation:
You should check if the API can provide the data you need, how to request that data, and what the return format will be.
-
Request an API developer key:
You will need to request a unique user key/access token to be sent with each request since web services generally limit the number of requests you can make. In order to get a key/token, you will need to agree to the API's terms, which restrict how you can use the service. If you are uncomfortable with any of the terms, please contact your professor.
Make sure to keep your key/token secret! If someone else gets a hold of it, they can use it to make requests on your behalf, potentially using up your request limit or even getting you banned from the service. You should store your key in a separate file (e.g.
.env) and add it to your.gitignorefile to prevent it from being uploaded to GitHub. If your .env file accidentally gets pushed to GitHub, you should immediately rotate (regenerate) your API keys on the provider website. -
Test your application and launch to users:
The first API we will use is the Mapbox, which allows you to specify a place name or address and receive its latitude and longitude. Take a few minutes to read the documentation (it's quite good), or play around with the playground. You need to sign up and get a free Access Token here.
Back? Ok cool, let's try it out in Python. We're going to request the response in JSON format, which we can decode using Python's json module.
import json
import os
import pprint
import urllib.request

from dotenv import load_dotenv

load_dotenv()

MAPBOX_TOKEN = os.getenv("MAPBOX_TOKEN")
MAPBOX_BASE_URL = "https://api.mapbox.com/search/searchbox/v1/forward"

if MAPBOX_TOKEN is None:
    raise RuntimeError("MAPBOX_TOKEN is not set. Check your .env file.")

query = "Babson College"
query = query.replace(" ", "%20") # In URL encoding, spaces are typically replaced with "%20". You can also use `urllib.parse.quote` function.
url=f"{MAPBOX_BASE_URL}?q={query}&access_token={MAPBOX_TOKEN}"
print(url) # Try this URL in your browser first

with urllib.request.urlopen(url) as resp:
    response_text = resp.read().decode("utf-8")
    response_data = json.loads(response_text)
    pprint.pprint(response_data)
You may use either urllib.request (shown in our examples) or the requests library (as AI may suggest you). If you choose requests, please keep the code simple and well commented.
We used the pprint module to "pretty print" the response data structure with indentation, so it's easier to visualize. You should see something similar to the JSON response from the documentation, except built from Python data types. This response data structure is built from nested dictionaries and lists, and you can step through it to access the fields you want.
print(response_data["features"][0]["properties"]["address"]) # Think about how to access other fields as well
# 231 Forest St
What you need to do: Write a function (maybe two) that takes an address or place name as input and extract the latitude and longitude from the JSON response, which is probablly get_json(url: str) -> dict and get_lat_lng(place_name: str) -> tuple[str, str].
In the above example we passed a hard-coded URL to the urlopen function, but in your code you will need to generate the parameters based on user input. Check out Understanding URLs and their structure for a helpful guide to URL components and encoding.
You can build up the URL string manually via using f-string and str.replace function as in the example above, but it's probably helpful to check out urlencode or parse from urllib.parse module.
What you need to do: Write a function that takes an address or place name as input and returns a properly encoded URL to make a Mapbox geocoding request.
Now that we can find the coordinates of a given place, let's take things one step further and find the closest public transportation station to that location.
To accomplish this, we will use the MBTA-realtime API. Check out the details for GET /stops in the documentation.
Hints: Prepare valid latitude and longitude coordinates of any Boston address for testing. Under GET /stops in the documentation, click "Try it out" button. Enter/select the following parameters:
sort: select "distance" (not "-distance") for ascending order.filter[latitude]: enter the testing latitude value.filter[longitude]: enter the testing longitude value.
Then click "Execute" button. You should be able to find a generated URL in Curl. Observe the generated URL and learn how to build that URL using variables. Don't forget to add api_key={YOUR_MBTA_API_KEY}& right after ? in the URL. Note: You need to request an API key from MBTA V3 API Portal.
What you need to do: Create a function that takes a latitude and longitude and returns two values: the name of the closest MBTA stop, whether it is wheelchair accessible, which is get_nearest_station(latitude: str, longitude: str) -> tuple[str, bool]
Note: Unfortunately there are no MBTA stops close enough (approximately a half mile) to Babson College - you have to get out into the city!
Combine your functions from the previous sections to create a tool that takes a place name or address as input, finds its latitude/longitude, and returns the nearest MBTA stop and whether it is wheelchair accessible, which is find_stop_near(place_name: str) -> tuple[str, bool].
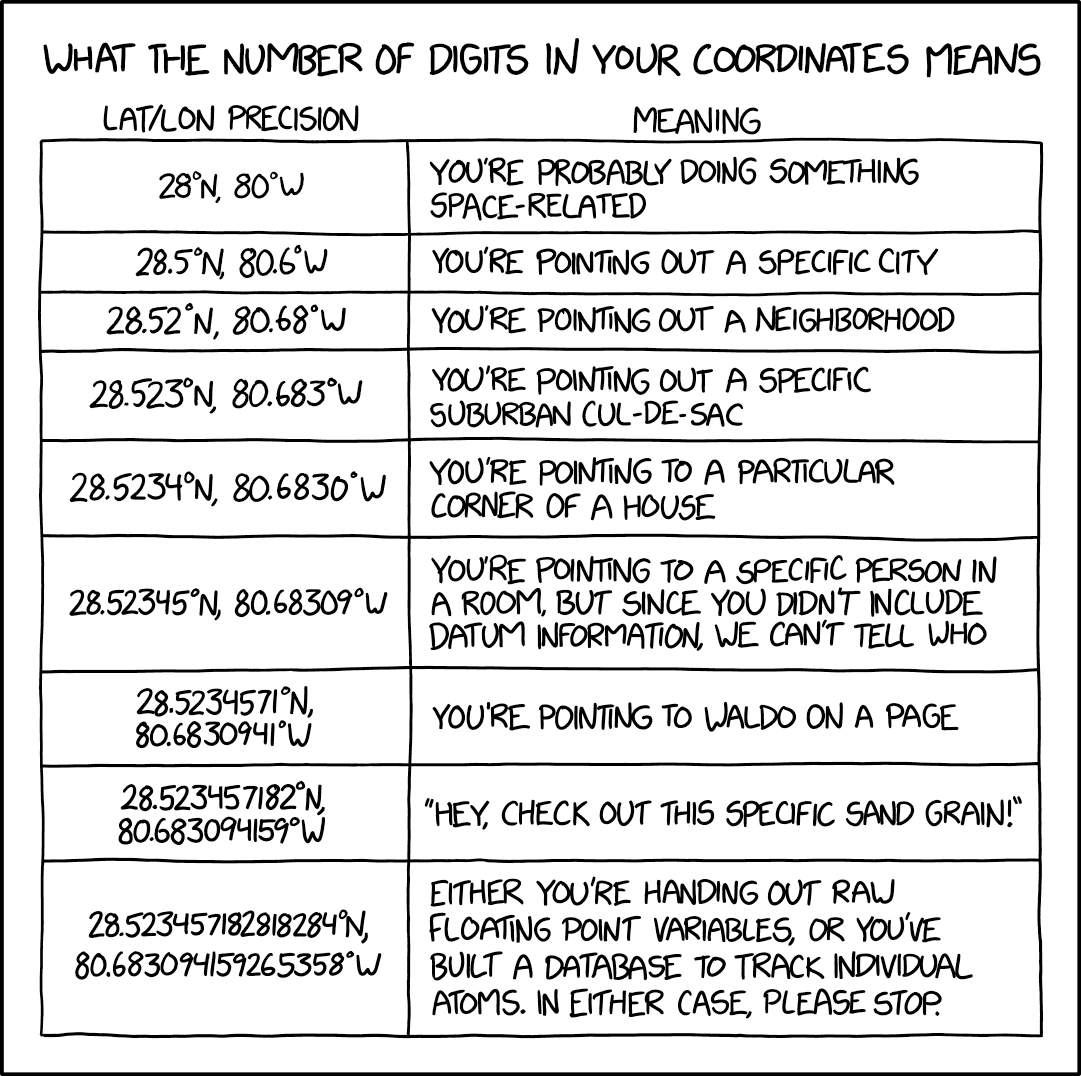
Note: Coordinate precision matters! Check out xkcd 2170 - "What the Number of Digits in Your Coordinates Means" and explanation.
Inside the main() function of mbta_helper.py, you should write a few simple test calls to make sure your functions work correctly before moving on to the Flask part of the project.
For example:
if __name__ == "__main__":
    print(get_lat_lng("Boston Common"))
print(find_stop_near("Boston Common"))- Try out some other MBTA APIs - there are a lot of resources, and we have barely scratched the surface.
- By default,
stopsgives all types of transportation, including buses and commuter rail. Allow the user to specify how they'd like to travel (e.g. T only). - Incorporate the MBTA realtime arrival data to suggest the optimal station to walk to.
- Connect with other local services. Example: the City of Boston has an app that uses a phone's GPS and accelerometer to automatically report potholes to be fixed. You can also see many other apps developed for Boston residents here.
The goal for Part 2 is to build a simple website that uses the mbta_helper module you created in Part 1.
To achieve this, we will use Flask - a lightweight and powerful web framework for Python that is easy to learn and simple to use, allowing you to build your web app quickly.
You need to first install Flask. Run the following command:
> python -m pip install flask # on Windows
# or
> python3 -m pip install flask # on macOS/LinuxIn the introduction, we defined Flask as a "web framework", but what does that actually mean? Let's dig deeper. Before this, let's develop a better understanding of how the internet works.
When you open up a web page in your browser (e.g. Chrome, Firefox, etc.), it makes an HTTP request to a server somewhere in the world. This could be something like GET me the home page. This server handles this request, sending back data (this can be in the form of HTML, JSON, etc.), which is rendered by your browser.
This is where Flask comes in - it enables you to create the logic to make a web server quickly in Python and process data in the backend. You can write logic that will execute when a request is made for one of your routes (e.g. <www.MyTicTok.com/new>).
Read the following sections of Flask Quickstart documentation:
- A Minimal Application
- Debug Mode
- Routing
- Variable Rules
- Unique URLs / Redirection
- Behavior
- URL Building
- HTTP Methods
- Static Files
- Rendering Templates
- Redirects and Errors
Suggestion: Follow every single step in this tutorial. Replicate all the code. Make the server run!
What use is a web application if you can't get any data back from the user? Let's set up your own app and getting input from the user. Here are some end specifications:
- Upon visiting the index page at
http://127.0.0.1:5000/, the user will be greeted by a page that says hello, and includes an input form that requests a place name. - Upon clicking the 'Submit' button, the data from the form will be sent via a POST request to the Flask backend at the route
POST /nearest_mbta - (Optional) Perform some simple validation on the user input. You can use wtforms to implement the validation.
- The Flask backend will handle the request to
POST /nearest_mbta. Then your app will render ambta_station.htmlpage for the user - presenting nearest MBTA stop and whether it is wheelchair accessible. In this step, you need to use/import the module (mbta_helper) you created for Part 1. - If something is wrong, the app will render a simple error page, which will include some indication that the search did not work, along with a button or link that redirects the user back to the home page.
It will be up to you to make this happen. If you feel confident in your ability to implement this, go for it! If you'd like more scaffolding, continue reading.
To complete this project, the official Flask documentation will get you pretty far.
-
HTML Forms:. To make forms in HTML, check out MDN web docs and/or W3Schools. For even more information, check this out.
-
Sending
POSTRequests: To send the data from the form in aPOSTrequest, use an input with typesubmit, and set the action of the form to reflect the destination in your routes. -
Handling POST Requests: To learn more about handling post requests in Flask, read section HTTP Methods again.
-
Accessing the Form Data: To access the form data, check out section 'The Request Object' on using the Flask
requestutility.
-
Want to keep track of some data in your web app? Instead of using a
.txtfile or apicklefile, it's common practice in nearly any web app to use a database. A few especially well-known database choices areMySQL,SQLite(my go-to choice for a quick project/demo), orPostgreSQL, which all use SQL (Structured Query Language) to manipulate all stored data, as do many other common relational databases. Alternatively, you may useMongoDb, which stores data in an unstructured format similar to JSON. MongoDb is stupidly easy to set up and use, but I'd stop and think first before jumping right in. It may be the easy choice, but representing your data intelligently in a relational table can be much more effective and less of a headache later on. -
But HTML is so ugly! HTML alone may not look visually appealing, which is why we use CSS (Cascading Style Sheets) to add some extra flair and style to our HTML. You can change pretty much anything about HTML - colors, shapes, sizes, placement, etc. - with CSS rules. It's also pretty simple to write. Check out resources such as MDN Web Docs and/or W3Schools to learn more about CSS.
-
What about making my website more dynamic? While this class may focus on Python, you can venture out a little and use
Bootstrap,Tailwind CSSorshadcn/uito add dynamic elements to your web app. They might sound scary, but you use it in a way similar to adding/linking CSS styling to your HTML. You can also write vanilla JavaScript (which isn't too difficult), which allows you to create more beautiful, responsive, and dynamic content for your web app. -
Interested in an alternative to Flask? Learn more about Django. They don't have many major differences other than some small quirks in conventions and style.
-
Ready to put your web app online? Deploying your app to the internet is simpler than it sounds. You can host it on cloud platforms like PythonAnywhere (free), Render, Railway, Heroku, etc. Check out the Flask documentation on Deploying to Production for more information.
After completing the required parts of this project, you can spice it up by adding additional features. Some suggestions:
- Refer to 6. Making it Cooler (Optional) section in Part 1 and 6. Going Further (Optional) section in Part 2 for more ideas.
- Display weather information - Add real-time weather data for an extra interactive touch! Note: While the weather might be similar across locations (since we're focusing on the Greater Boston area), this feature adds a layer of engagement. Say "hello" to our old friend, OpenWeatherMap API.
- Any interesting events in the nearby area? Try Ticketmaster API to find out concerts, sport events information.
- Yes, you guessed it! - More APIs. Some suggestions:
- Get Creative with AI - Stuck or looking for new ideas? Try using an AI tool for a quick brainstorming session! It can help you come up with fun feature ideas, suggest code snippets, or even troubleshoot API integrations. Think of it like having an extra teammate to bounce ideas off and make your project stand out.
Fork this template repository to create a new public repository, keeping the default name from the template. If working in a team, add the other member as a collaborator on GitHub and follow GitHub collaboration best practices. Once the repository is forked, clone your fork (the version under your GitHub profile) to your computer.
Write a summary of your project and your reflections on it in README.md, using Markdown format (1 per team, not 1 per person). The README.md file should include the following sections:
Write a clear and concise description of your project. Summarize:
- The main goal of your web app
- The core features you implemented
- Any extensions, “Wow!” features, or creative additions beyond the basic requirements
This paragraph should read like an abstract: short, factual, and focused on what your app does.
After completing the project, write a short but thoughtful reflection covering the points below. Avoid generic statements. Refer to specific examples from your work.
-
Development Process. Reflect on your workflow during the project. You may discuss:
- What went well (e.g., breaking the problem into functions, testing helper functions early, debugging strategies)
- What was challenging (API errors, URL formatting, JSON structure, Flask routing, etc.)
- How you approached problem-solving
- What you would change if you were doing the project again
Focus on process, not just results.
-
Teamwork & Work Division. Explain how your team planned and actually divided the work. You may discuss:
- Who handled which parts (APIs, helper module, Flask routes, HTML templates, CSS, etc.)
- Whether your plan changed
- Any communication or coordination issues and how you resolved them
- What you would do differently next time to improve collaboration
If you worked alone, write about how you managed your tasks.
-
Learning & Use of AI Tools. Discuss what you learned and how this project contributed to your understanding of:
- APIs and JSON data
- Flask and backend web development
- Project organization and debugging
- Writing helper functions and integrating modules
Also reflect on your experience using AI tools:
- What AI tools you used (e.g., ChatGPT, GitHub Copilot, etc.)
- How AI helped (ideas, troubleshooting, code review, debugging, learning unfamiliar libraries)
- Any limitations you discovered
- What you wish you had known earlier
Include screenshots showing important moments in development (e.g., debugging API output, testing in main(), your first working Flask form, error messages you solved, etc.).
Note:
- Start by listing all team members' names at the top of the document.
- Make the
README.mdfile clear and concise. There is no need to use fancy words or ChatGPT.
- Push your completed code and updated
README.mdto your GitHub repository (the repository where your team has been working on). - Submit the project's GitHub repository URL to Canvas. In the Canvas comment section, include the names of all team members. Note: Every team member must submit on Canvas and add this comment.
Updated: 11/16/2025